| View previous topic :: View next topic |
| Author |
Message |
FreeXBird


Joined: 24 Mar 2007
Posts: 2485
|
 Posted: Sun Jun 08, 2008 4:01 am Post subject: In Depth Guide to Bulls On Parade (Unfinished) (More added!) Posted: Sun Jun 08, 2008 4:01 am Post subject: In Depth Guide to Bulls On Parade (Unfinished) (More added!) |
 |
|
Introduction
Hello. This is a guide to FC'ing the song Bulls On Parade. This is not the guide for PASSING it, or 5*'ing it, but to FC it and get those nice, gold stars.
How To Unlock
You unlock this song by beating Tom Morello in battle mode in Career. He is in the 2nd tier, and has a killswitchy/scratchy boss battle. After you beat him, you will be asked to play an encore with him. And that encore is Bulls On Parade. Chances are you won't FC this sightread, because it has tricky parts. After you beat it (It's fairly easy to pass), you get it to be able to be played forever.
General Info
Number of Notes In The Song: 743
1st Place Score For The Song: 289,887
So Far The Highest Star Ranking: 7.9 Stars
Note Chart
Optimal SP Path
===============================================================================================
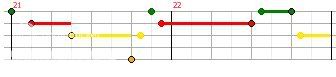
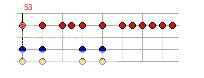
Octave Riff Intro
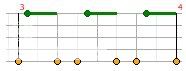
This is the intro. It repeats 7 times. Now, if you can't keep your hand stretched, just play the Orange Note with your pinky finger (#4) then release and slide your hand and press the Green Note with your index finger (#1). But if you can keep your hand stretched, just anchor your index finger (#1) on the Green Note, and release/press your pinky finger (#4) on the Orange Note. The chart below demonstrates the fingering.
Bold Numbers Indicate Anchoring, Colored Numbers Indicate Tapping
You can only get 1 Star Power phrase in here, but you can whammy 3 notes of it for a little extra.
===============================================================================================
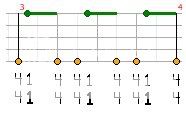
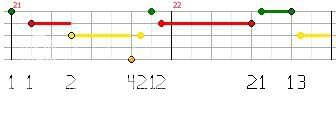
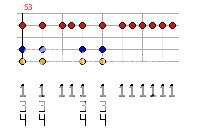
Wah Riff 1
This is the Wah Riff. It repeats 8 times. It is tricky because it has average speed Green Notes and  chords spread in it. All right, to play this is simple. Simply hold your index finger (#1) on the Green Fret, and when there are chords, simply just press your ring finger (#3) and pinky finger (#4) onto the Yellow and Blue Frets respectively. If you have a weak pinky finger (#4), you could stretch your middle finger (#2) to the Yellow Note and your ring finger (#3) to the Blue Fret. The chart below shows the fingering for it. chords spread in it. All right, to play this is simple. Simply hold your index finger (#1) on the Green Fret, and when there are chords, simply just press your ring finger (#3) and pinky finger (#4) onto the Yellow and Blue Frets respectively. If you have a weak pinky finger (#4), you could stretch your middle finger (#2) to the Yellow Note and your ring finger (#3) to the Blue Fret. The chart below shows the fingering for it.
Bold Numbers Indicate Anchoring, Colored Numbers Indicate Tapping
You can only get 1 Star Power Phrase here; no notes you can whammy.
===============================================================================================
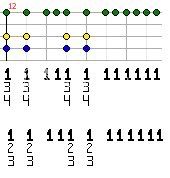
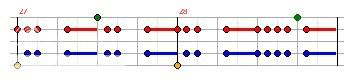
Verse 1
This is the main verse. It repeats 4 times. It has hammer-ons and pulloffs, so use these to your advantage. The easiest way to hit this would be to hit the Green Note with your index finger (#1), then hit the Red Note by sliding your index finger (#1) to the Red Fret, then hit the Yellow Note with your middle finger (#2), then strum the Orange Note with your pinky finger (#4). Now, the next 3 notes are hammer-ons and pulloffs, so you don't have to strum these. I strum the Red Hold Note to stay in rythm, but it's not necessary. Now, after you strum the Orange Note, hit the Yellow Note with your middle finger (#2), then slide your hand down and hit the Green Note with your index finger (#1), then hit the Red Note with your middle finger (#2). Since it's a hold note, keep your finger held down on the red, and prepare for a red note right after the end of the hold. Hit the Red Note after the hold with your middle finger (#2), then either strum OR pulloff into the Green Note and hitting it with your index finger (#1), then hit the Green Note after the hold with your index finger (#1) which should already be on the Green Fret, then strum OR hammer-on the Yellow Note with your ring finger (#3). The chart below displays the fingering for this.
Bold Numbers Indicate Anchoring, Colored Numbers Indicate Tapping
There is only 1 Star Power Phrase in this, but there are 5 notes you can whammy for extra Star Power.
===============================================================================================
Chorus 1
This is the chorus. It has a lot of chords, and a lot of hand positioning slides. It repeats 4 times. To hit this, hit the Red/Orange Chord with your index finger (#1) and pinky finger (#4), then hit both Red/Blue Chords following it with your index finger (#1) and ring finger (#3). Now, in the pause after the chords, slide your hand down and hit the Red/Blue Hold Chord with your middle finger (#2) and your pinky finger (#4). After the hold note, hit the Green Note with your index finger (#1), then hit the next two Red/Blue Chords with your middle finger (#2) and pinky finger (#4). Now, in the pause after the chords, slide your hand up to hit the Red/Blue Hold Chord with your index finger (#1) and ring finger (#3), then when the hold is done hit the Red/Orange Chord with your index finger (#1) and your pinky finger (#4), and hit the following two Red/Blue Chords with your index finger (#1) and your ring finger (#3). After the chords, during the pause, slide your hand down and hit the next five Red/Blue Chords with your middle finger (#2) and pinky finger (#4), then hit the Green Note with your index finger (#1). This is the tricky part. You need to slide your hand up to hit the Red/Blue Chord with your index finger (#1) and ring finger (#3); It's tricky cause you just used your index finger (#1) on the Green Note. So be sure to slide correctly and to hit both notes. Now, if you're bad at sliding but you can stretch your pinky, you could try playing in the First Position (Index on Green, Middle on Red, Ring on Yellow, Pinky on Blue) and for the Red/Orange Chords just playing with your middle finger (#2) and pinky finger (#4), sliding your pinky up to the Orange Fret, and sliding it down to the Blue Fret when necessary. The chart below shows both fingerings for this.
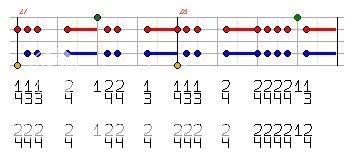
Bold Numbers Indicate Anchoring, Colored Numbers Indicate Tapping
There is only 1 Star Power Phrase in this, but there are 4 notes you can whammy for extra Star Power.
===============================================================================================
Verse 2
It's identical to Verse 1, so you can just follow that or re-read this. It repeats 4 times. It has hammer-ons and pulloffs, so use these to your advantage. The easiest way to hit this would be to hit the Green Note with your index finger (#1), then hit the Red Note by sliding your index finger (#1) to the Red Fret, then hit the Yellow Note with your middle finger (#2), then strum the Orange Note with your pinky finger (#4). Now, the next 3 notes are hammer-ons and pulloffs, so you don't have to strum these. I strum the Red Hold Note to stay in rythm, but it's not necessary. Now, after you strum the Orange Note, hit the Yellow Note with your middle finger (#2), then slide your hand down and hit the Green Note with your index finger (#1), then hit the Red Note with your middle finger (#2). Since it's a hold note, keep your finger held down on the red, and prepare for a red note right after the end of the hold. Hit the Red Note after the hold with your middle finger (#2), then either strum OR pulloff into the Green Note and hitting it with your index finger (#1), then hit the Green Note after the hold with your index finger (#1) which should already be on the Green Fret, then strum OR hammer-on the Yellow Note with your ring finger (#3). The chart below displays the fingering for this.
Bold Numbers Indicate Anchoring, Colored Numbers Indicate Tapping
There is only 1 Star Power Phrase in this, but there are 5 notes you can whammy for extra Star Power.
===============================================================================================
Chorus 2
It's identical to Chorus 1, so you can just follow that or re-read this. It has a lot of chords, and a lot of hand positioning slides. It repeats 4 times. To hit this, hit the Red/Orange Chord with your index finger (#1) and pinky finger (#4), then hit both Red/Blue Chords following it with your index finger (#1) and ring finger (#3). Now, in the pause after the chords, slide your hand down and hit the Red/Blue Hold Chord with your middle finger (#2) and your pinky finger (#4). After the hold note, hit the Green Note with your index finger (#1), then hit the next two Red/Blue Chords with your middle finger (#2) and pinky finger (#4). Now, in the pause after the chords, slide your hand up to hit the Red/Blue Hold Chord with your index finger (#1) and ring finger (#3), then when the hold is done hit the Red/Orange Chord with your index finger (#1) and your pinky finger (#4), and hit the following two Red/Blue Chords with your index finger (#1) and your ring finger (#3). After the chords, during the pause, slide your hand down and hit the next five Red/Blue Chords with your middle finger (#2) and pinky finger (#4), then hit the Green Note with your index finger (#1). This is the tricky part. You need to slide your hand up to hit the Red/Blue Chord with your index finger (#1) and ring finger (#3); It's tricky cause you just used your index finger (#1) on the Green Note. So be sure to slide correctly and to hit both notes. Now, if you're bad at sliding but you can stretch your pinky, you could try playing in the First Position (Index on Green, Middle on Red, Ring on Yellow, Pinky on Blue) and for the Red/Orange Chords just playing with your middle finger (#2) and pinky finger (#4), sliding your pinky up to the Orange Fret, and sliding it down to the Blue Fret when necessary. The chart below shows both fingerings for this.
Bold Numbers Indicate Anchoring, Colored Numbers Indicate Tapping
There is only 1 Star Power Phrase in this, but there are 4 notes you can whammy for extra Star Power.
===============================================================================================
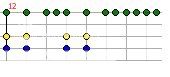
Wah Riff 2
This is the Wah Riff 2. It's near identical to Wah Riff 1, but Wah Riff 2 is in the Second Position and it's half the length. Anyway, anchor the Red Note and hit the  Chords with your ring finger (#3) and pinky finger (#4) when they come. Simple as that. The chart belows shows the fingering for this. Chords with your ring finger (#3) and pinky finger (#4) when they come. Simple as that. The chart belows shows the fingering for this.
Bold Numbers Indicate Anchoring, Colored Numbers Indicate Tapping
There are no Star Power Phrases in this section.
===============================================================================================
Will update more later.
Last edited by FreeXBird on Sun Jun 08, 2008 2:16 pm; edited 1 time in total |
|
| Back to top |
|
 |
Dante2006

Joined: 02 Apr 2008
Posts: 77
Location: Gillam, MB
|
| Posted: Sun Jun 08, 2008 6:56 am Post subject: |
|
|
Just a small bit of advice, but when if you're having trouble with the Killswitch Scratch, take it into practice, slow it down and just watch it, paying attention to where the notes are. I did this and FCed it right after.
_________________
Let The Metal Flow |
|
| Back to top |
|
|
FreeXBird
Joined: 24 Mar 2007
Posts: 2485
|
| Posted: Sun Jun 08, 2008 2:18 pm Post subject: |
|
|
| Dante2006 wrote: | | Just a small bit of advice, but when if you're having trouble with the Killswitch Scratch, take it into practice, slow it down and just watch it, paying attention to where the notes are. I did this and FCed it right after. |
I might add this or paraphrase this to the guide, if I may?
Also, added 3 more sections and the solo is up next. It might take some time to find the right technique, so be patient. |
|
| Back to top |
|
|
CRAPYKAUH


Joined: 15 Jun 2007
Posts: 479
Location: Albuquerque, New Mexico
|
|
| Back to top |
|
|
FreeXBird
Joined: 24 Mar 2007
Posts: 2485
|
| Posted: Sun Jun 08, 2008 11:17 pm Post subject: |
|
|
| CRAPYKAUH wrote: | This is a very detailed guide
Im not trying to be mean though but why did you make a guide on this song? the only actual remotely hard part is killswitch scratch which given a few runs is easy enough anyway.
Good guide but I dont know why anyone would need it  |
1) It can be tricky to beginners
2) I needed to make my first guide remotely easy |
|
| Back to top |
|
|
ThExSAiNT

Joined: 06 May 2008
Posts: 72
|
| Posted: Mon Jun 09, 2008 3:09 am Post subject: |
|
|
| CRAPYKAUH wrote: | This is a very detailed guide
Im not trying to be mean though but why did you make a guide on this song? the only actual remotely hard part is killswitch scratch which given a few runs is easy enough anyway.
Good guide but I dont know why anyone would need it |
I agree. You seem pretty talented at making guides. You should have made it on a more challenging song.
_________________
|
|
| Back to top |
|
|
FreeXBird
Joined: 24 Mar 2007
Posts: 2485
|
| Posted: Mon Jun 09, 2008 3:35 am Post subject: |
|
|
| ThExSAiNT wrote: | | CRAPYKAUH wrote: | This is a very detailed guide
Im not trying to be mean though but why did you make a guide on this song? the only actual remotely hard part is killswitch scratch which given a few runs is easy enough anyway.
Good guide but I dont know why anyone would need it |
I agree. You seem pretty talented at making guides. You should have made it on a more challenging song. |
Thank you.  It's my first guide and it might be too long for people to read cause it's so detailed, but I just wanna make sure anyone who maybe be choking because of unproper hand placements or beginners who have no idea about techniques can just FC this. It's my first guide and it might be too long for people to read cause it's so detailed, but I just wanna make sure anyone who maybe be choking because of unproper hand placements or beginners who have no idea about techniques can just FC this. |
|
| Back to top |
|
|
Dante2006
Joined: 02 Apr 2008
Posts: 77
Location: Gillam, MB
|
| Posted: Mon Jun 09, 2008 7:21 am Post subject: |
|
|
| FreeXBird wrote: | | Dante2006 wrote: | | Just a small bit of advice, but when if you're having trouble with the Killswitch Scratch, take it into practice, slow it down and just watch it, paying attention to where the notes are. I did this and FCed it right after. |
I might add this or paraphrase this to the guide, if I may?
Also, added 3 more sections and the solo is up next. It might take some time to find the right technique, so be patient. |
You can add that advice into the guide if you want.
_________________
Let The Metal Flow |
|
| Back to top |
|
|
Graf 
Joined: 08 Aug 2007
Posts: 6213
Location: Lanoka Harbor, New Jersey
|
| Posted: Mon Jun 09, 2008 7:45 am Post subject: |
|
|
Good guide, can't wait to see one for a toughie like The Way It Ends
_________________
|
|
| Back to top |
|
|
Beedlebub


Joined: 22 Feb 2008
Posts: 1221
Location: Bendigo, Australia
|
| Posted: Mon Jun 09, 2008 9:59 am Post subject: |
|
|
| FreeXBird wrote: | | Thank you. It's my first guide and it might be too long for people to read cause it's so detailed, but I just wanna make sure anyone who maybe be choking because of unproper hand placements or beginners who have no idea about techniques can just FC this. |
I understand what you mean. It's good to get some practice before you start guides of trickier songs. It's set up quite well and is very in-depth, So good job on that.
As others have said, Great Guide. Good use of chart pics rather than Freticons.
_________________
| Torchy wrote: | Oh great, I've gone and turned it into another fucking "ROK BEND KUIK UR AZS LOSAR NEVORSAF SUX" board
God damnit. |
|
|
| Back to top |
|
|
FreeXBird
Joined: 24 Mar 2007
Posts: 2485
|
| Posted: Mon Jun 09, 2008 12:16 pm Post subject: |
|
|
Thanks for all the positive comments. I am working on Killswitch Scratch and should hopefully be up later today. I am working on Killswitch Scratch and should hopefully be up later today. |
|
| Back to top |
|
|
|
|
You cannot post new topics in this forum
You cannot reply to topics in this forum
You cannot edit your posts in this forum
You cannot delete your posts in this forum
You cannot vote in polls in this forum
|
Copyright © 2006-2024 ScoreHero, LLC
|
Powered by phpBB
|